
Rigging & Low Impact Practices
Photo by Abbey Jo Arlt
After becoming familiar with anchor types, visitors should review local rigging practices aimed to reduce environmental impact. The 4 basic steps for rigging are inspecting the anchor, rigging for rappel, rope deployment, and rope retrieval. If these 4 steps are done thoughtfully, we can increase efficiency and reduce our impact on the environment (and our gear). I will cover the 4 steps of rigging and apply low impact practices to each.
Step 1: Inspecting & Modifying
Inspecting and modifying an anchor is the first and most important step in rigging that is sometimes overlooked. Learning to properly inspect an anchor involves evaluating all of the anchor parts: the source, the webbing, the knot, and the rapide. If any part of the anchor is damaged or of questionable quality it should be modified or replaced. Anchors should be built to be safe and have low impact on the surrounding environment.
The Source- Check that the source is in good to excellent condition and has not recently been altered or damaged. Check for damaged limbs, and bark on trees and for movement or shifting of boulders. If an anchor source has been compromised, modifications may be needed. Fallen trees and natural debris should be moved up-canyon and away from the rappel zone.
The Webbing- The webbing should be evaluated for fading, discoloration, flakey texture, rips, cuts, or chewing related damage. Webbing should also be checked to make sure it is of climbing grade, 1 inch, and black or natural in color (tan, rust, olive). Too much webbing can be a quick and simple fix, with a little trimming down and modifying. Webbing that is damaged or that does not meet Sedona standards should be replaced and disposed of properly.
The Knot- The knot should be checked that it is a water knot with about 3-4 inches of tail. The knot should be checked for fraying or abrasion. Sometimes a master knot is not equalized and should be modified as well. Checking the knot is fairly easy, if it’s not then just re-do it.
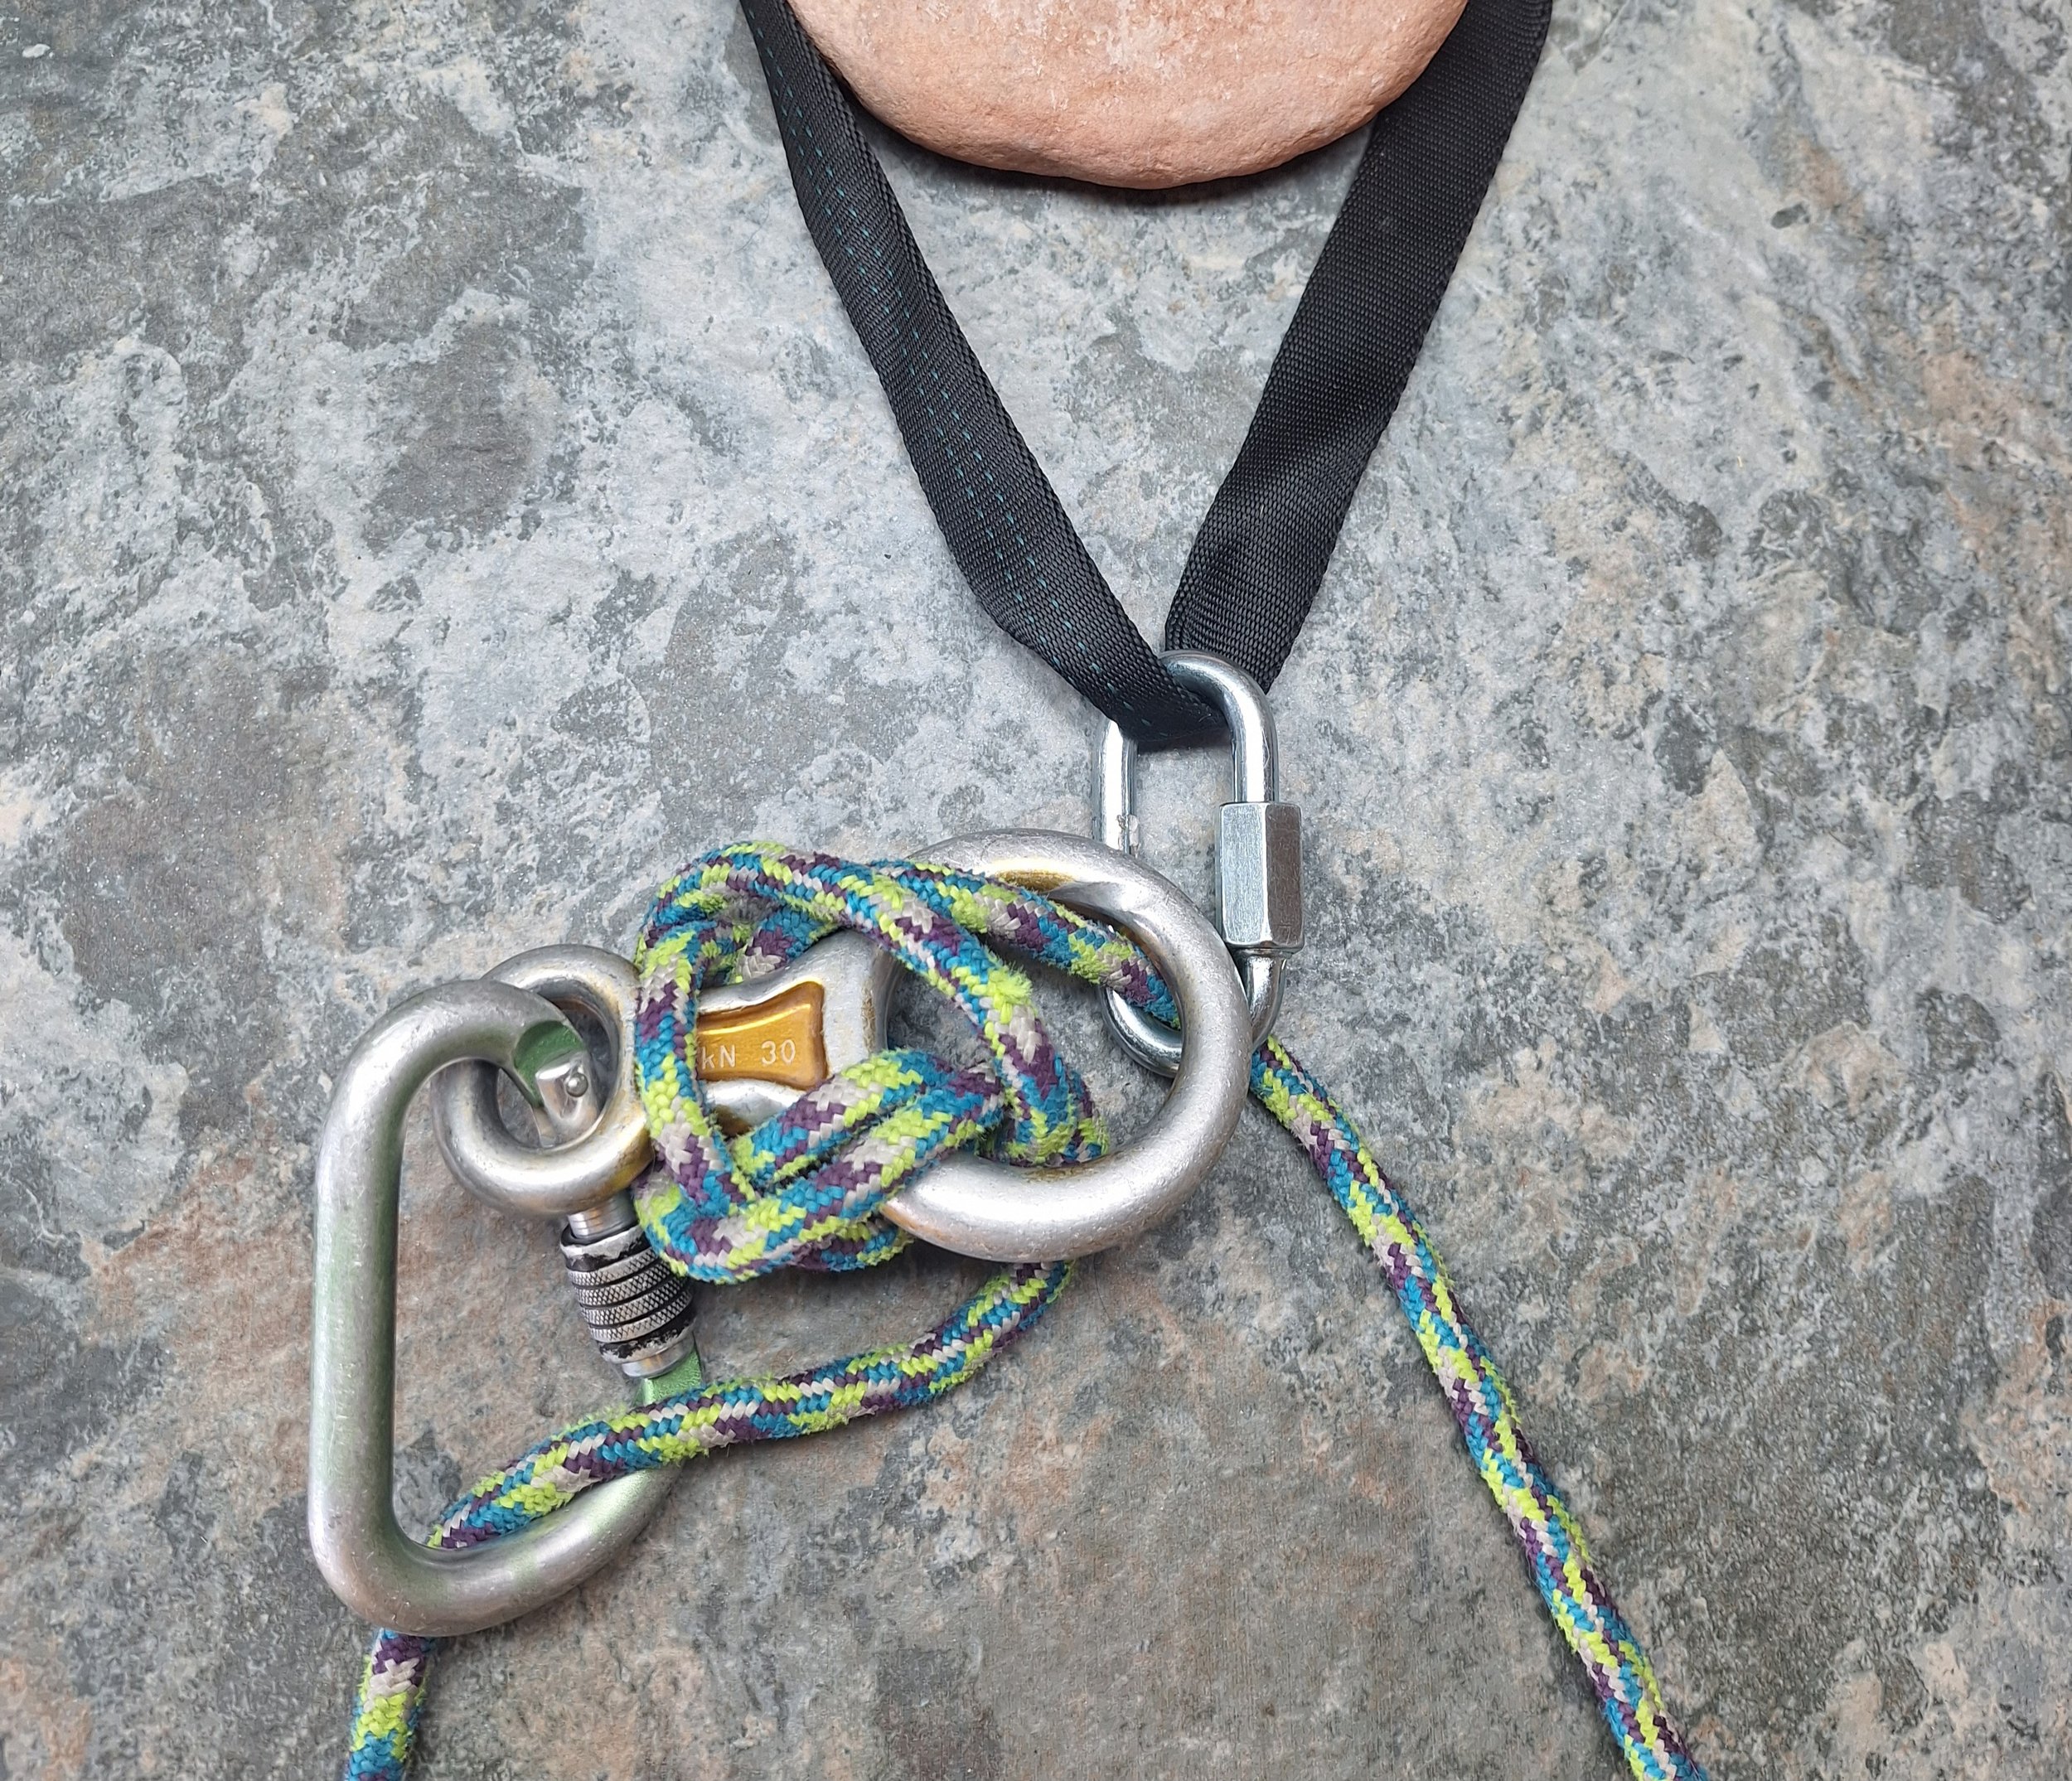
The Rapide or Quick Link- As mentioned on the anchor page, quick links should be checked that they are stamped with a SWL or WLL and a rating in LB’s or KN’s. Rapides should also be checked that the gate is closed tight and that they are not rusted or corroded. Lastly, quick links should be 5/16” to allow easy retrieval, and safe rigging.
Removing old webbing, rapides, and trash is a low impact practice that anyone can help with.
After checking all of the parts of an anchor it’s important to look at the area around the anchor for any loose rocks, tree branches, or other hazards within the working area. Now that your anchor and area are safe, let’s get ready to rig!
Step 2: Rigging the Rappel
When it comes to rigging it’s good to keep it simple and start with the two basic type of rappels: Double and Single Strand Rappels.
Double Strand Rappels
The first and most basic style of rigging a rappel is called the double strand or double rope rappel. This style is the most beginner friendly as it follows an easy concept of “get both ends on the ground, and rappel down both”. The up-side to double rope rappels is when they are set to length, it can prevent rope damage and core shots caused by blocks. Double rope rappels aren't so bad on drops under 50’. The downside is that beginners can lean on double rope rappels as a crutch, and with poor rope management skills, retrieval and twisting issues are likely to occur.
A low impact practice with double rope rappels is to set the rope length so you don’t have to pull as much through during retrieval
Single Strand Rappels-
Single strand or single rope rappels are often quicker, more efficient, and environmentally friendly when compared to double strands. Single Strand rappels are achieved by blocking one side of the rope to prevent it from sliding through the rapide, and rappelling on the fixed end. The other end of the rope is used as the pull side for retrieval. Another upside to single strand rappels is that they use less rope. Rappelling down one strand of the rope is relatively faster, but often less jerky and more enjoyable. There are two main types of “blocks” that I will cover: Contingency & Carabiner Blocks.
Contingency Block
Contingency blocks, also known as “rigging to lower”, or figure-8 blocks, are a safe way to rig a rappel in the event that the rappeler may need to be lowered to the ground. Rigging contingency anchors is a necessary skill for Experienced Canyoneers and Canyon Leaders. A low-impact practice when using contingency anchors is to remove the figure-8 and convert to a double rope rappel or toggle before the last person down. The upside to these anchors is that they are really safe and fairly simple. It is important to note that there is still a danger of rappelling off the wrong side of the rope with any type of block. This can be prevented by keeping the pull side of the rope up at the anchor until the last person down. The downsides of contingencies are abrasion and retrieval issues if not removed.
Carabiner Block
The Triple Clove Hitch is our primary knot for biner blocks that can be quick and efficient with a little practice.
Also known as a biner block, carabiner blocks are a way of securing the rope to a carabiner to prevent it from going through the rapide. This allows the rappeler to use one side of the rope to rappel down, and the alternate (blocked) end for retrieval. The most effective way I have found to block a carabiner is with the Triple Clove Hitch. A triple clove hitch is easily achieved by stacking another loop into a traditional clove hitch; the additional hitch prevents any slipping under realistic forces. An advantage to single rope rappels is that they allow you set to rope length, using only the amount of rope needed to perform the rappel.
There are a few downfalls related to biner-blocks, the most problematic being that they are difficult to release under load. If a rescue scenario were to come into play, this type of rigging would be less than ideal. Secondly, with one end blocked there is always a risk of someone rappelling down the wrong end of the rope. The best way to prevent this is to keep the pull-side or no- rappelling side of the rope up at the anchor until the last person down. The last concern with the biner-block is the impact it can have on the environment. If a carabiner is not pulled before the last person down, it is likely to damage the sandstone and potentially core shot your rope. In conclusion, carabiner blocks can be effective when used correctly, but dangerous and problematic when not.
A Low impact practice for blocks is to remove them before the last person down. If they are not removed, then a good pull angle may help prevent abrasion.

Step 3: Deploying The Rope
Deploying the rope should be done strategically and efficiently. Blindly tossing ropes over the edge often ends poorly.
When deploying the rope, it’s recommended to attach the rope bag to your harness and trail the rope (or take the rope with you) to the edge. From the edge, look for a clear landing zone and warn potential hikers below. Blindly throwing ropes could result in hiker injuries, environmental impact, and rappelling related mishaps. Trailing the rope to the edge until you can see a clear drop zone below is a safe low impact practice.

Josh Wilson trailing the rope to the edge on Droppin’ Low.
Step 4: Retrieving The Rope
Getting the rope back should be done in a way that is safe and doesn’t impact the environment. Thoughtful rope retrieval techniques will reduce the likelihood of stuck or damaged ropes and increase your chances of a successful rappel. The same techniques will also reduce the contact between the rope and the sandstone, helping to prevent rope grooves and environmental impact. A few simple steps can make retrieving the rope a smoother and easier process.
Before pulling the rope, make sure both ends are separated and not twisted.
Have one person manage the pull side and one person manage the rope.
Space the two ends away from each other.
The pull side should be taken out and away from the edge (within view of the anchor if possible) to reduce friction and prevent rope grooves.
Make sure everyone is clear of the fall lines and potential rockfall.
The puller should pull at a slow to moderate pace, pulling too fast can result in coils.
The rope should be flaked onto the ground in a neat pile,or stuffed into a bag during the pull.
The person managing the rope should make sure it’s free of tangles and coils as it goes up.
Stuck or abandoned ropes should be retrieved as soon as possible. If you need help, please reach out us.

Toggles & Retrievable Anchors
The last anchor style I will review is a retrievable anchor known as a toggle. I decided to introduce toggles last because this resource is geared more towards beginners, and some would say toggles are more advanced. Toggles involve increased risk and require experience and training to safely utilize. Experimenting with toggles and retrievable anchors is dangerous and could result in injury or death. Practice using toggles at home or in a controlled environment with someone who is well versed in retrievable anchors. A toggle can make ropework more efficient and reduce impact on the environment. When used correctly, a toggle can prevent damage caused by abrasion (rope grooves) to both the environment and your gear.
Moving Through the Canyon
The way we move through a canyon from start to finish has an impact on both the environment, and other recreationalists.
The Approach & Exit- On the hike to or from the route, staying on trail is an obvious way to reduce our impact as well as:
Avoiding sensitive terrain such as crypto crust, lichen, and moss.
Back track or return the way you came when you feel you may be off track.
Keep noise levels low helping to preserve peace and solitude.
Travel on durable surfaces (trails, sandstone, or in the watercourse)
Keeping your group on the same path.
Remove trash and litter.
Report graffiti, litter, and other concerns to local authorities.
Do not leave fixed handlines, cairns, ribbons, or alter the terrain.
Avoiding the use of micro-spikes or trekking poles with metal tips on rock.
Respect other outdoorsmen and recreationalists.
Respect archaeological sites and artifacts along your journey.
Travel in small groups.
Leave the drone at home.
Use Walkie Talkies and cell phones for communication.